If you have a television in your home, then you've undoubtedly seen commercials touting products that instantly remove tarnish from silver simply by dipping them in the product for a few seconds. Unfortunately, as with most products that seem too good to be true, those tarnish-removing dips not only remove tarnish from your silver, they actually irreversibly damage the precious metal.
But do not despair. Long gone are the days when Grandma spent hours polishing her silver, resulting in gnarled knuckles. Today there are products recommended by silversmiths and jewelers that gently clean your silver in a short amount of time, while preserving the integrity of the metal, as well as your hands. Never use rubber gloves when cleaning your silver, as rubber corrodes silver. Purchase a silver cleaner that will not harm your skin, and follow these directions to shine your silver to brilliance:
Wash and polish your silver at least four times each year to maintain its shine. Polish your silver in early November for the upcoming holiday season. For an aged look, leave some of the tarnish in scrollwork and crevices. Some foods can be corrosive to silver. In particular, eggs, salt, fruits, mayonnaise, vinegar, and onions are all harmful to silver, so take care to wash away traces of those foods immediately.
Never wash stainless steel and sterling silver in the same sink. When they contact each other, a chemical reaction can occur resulting in black spots on the sterling. While it is okay to wash silver in your dishwasher, remove it when the rinse cycle is finished so that you can immediately dry it to avoid water stains. Also, there may be caustic food residue left behind in your dishwasher and it may cause damage to silver.
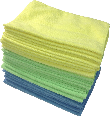
The Power of Microfiber! Zwipes Microfiber Cleaning Cloths will become your favorite tool for every cleaning task. This 36-cloth package is perfect for hundreds of uses in the garage, kitchen, bathroom, laundry, and all around the house. Each cloth is tough, streak-free, lint-free, reusable, and washable. Check out Microfiber Cleaning Cloths today!
Cleaning cast iron is not complicated. The basic rules are to clean and scrub down to the bare metal, and then treat it. ...
Discover MoreCleaning and polishing silver can be an expensive and time-consuming task. Here are some simple, inexpensive options that ...
Discover MoreUsed over an open campfire, a Dutch oven is a true oven; meaning that you can prepare pies, biscuits, cakes, and breads, ...
Discover MoreFREE SERVICE: Get tips like this every week in Cleaning Tips from Tips.Net. Enter your address and click "Subscribe."
There are currently no comments for this tip. (Be the first to leave your comment—just use the simple form above!)
FREE SERVICE: Get tips like this every week in Cleaning Tips from Tips.Net. Enter your address and click "Subscribe."
Copyright © 2026 Sharon Parq Associates, Inc.
Comments